Wednesday, September 22, 2010

The Great Plantain Experiment: Fried vs. Baked


Today my undying love for potassium lead me to pit the plantain against its nemesis: the plantain.  Let me explain.  Plantains are great.  They’re like bigger, harder, cheaper, more versatile bananas.  They can be served sweet or salted, soft or hard, mashed or whole, and, as I’ve now put to the test, baked or fried.


As long as I’ve eaten plantains, I always thought you could only fry them.  Fitting neatly into my rule that I can eat as much fried food as I want as long as I cook it, that was fine by me.  But I had a few fiascos.  Oils fires.  “Blackened” (i.e. black) plantains.  Oil burns on my hands.  Oil stains on my clothes.  Not to mention feeling like someone should roll me into bed after eating them with dinner.  All this from a mere fruit?  Yes.  Well, a fried fruit. (Is that an oxymoron?) Ew.

So when I heard about baked plantains, I tried it out.  Several times.  The first few attempts were not great.  They were hard.  They were dry.  They were flavorless.  It’s been a few months now though and my many attempts have paid off.  I’ve finally got it down.


Having spent so much time eating baked plantains, I was curious to see if they were actually better than fried plantains or if I had just convinced myself of that with cognitive dissonance in subconscious reaction to the somewhat frightening fries.  This is my account of that experiment.


To bake:
Smear halved plantains with about ½ tablespoon of butter.  Season with cinnamon to taste.  Bake at 350 Fahrenheit for 25 minutes.


That looks like a lot of butter.  It's actually not.


To fry:
Cut plantains into short diagonals.  Fry until golden brown on both sides in ½ inch canola, sunflower, or vegetable oil once the oil has time to heat. 


Result: Yes.  It’s true.  The baked plantains are moister, sweeter, and best of all, healthier.  They’re less of a hassle to prepare and clean up and they reheat better too.  I doubt I’ll have a reason to return to fried plantains any time soon.  EAT THESE SOON.

Monday, September 13, 2010

Black Bean Brownies

Yes, my loyal readership, I’ve returned.  And bearing gifts.  After a daunting bit of a hiatus due to some necessary steps involving my “future” (let’s not talk about that right now), I’m determined to tell the world about what’s got to be my fave new rave: Black Bean Brownies.

These delectable morsels are tricky.  Most vegan baking delights involve applesauce, vinegar, and other odd ingredients that don’t seem to mesh exactly with the intent of the recipe.  Fear not.  Black bean brownies will change your view on black beans.  And brownies for that matter.

After making these, I ran a controlled experiment by serving two types of brownies: one regular, old batch and one black bean.  No one could hazard a guess near the truth.  The best estimate of the difference was that the black bean set had fudge.  Negative.  I want you to know, too, that I gave the regular old brownies a fighting chance.  I added an extra egg to make them cake-like and I tossed in chocolate chips.  Nonetheless, they were nowhere near as moist and rich in flavor as the black bean brownies.

In describing them on their own, one could say black bean brownies are denser and moister than regular, old brownies.  They even looked better in the pan and didn’t have the tendency to crack.  They’re healthier, given the use healthy bean fiber in place of partially hydrogenated oils like vegetable oil.  They’re not as sickeningly sweet either – which means you can eat more without feeling guilty or like you need to boycott the white menace sugar for a month.  Conveniently, you can make them from scratch or with a box if you prefer.  Just replace all wet ingredients (eggs, oil, water) with one can of black beans.


Give these things a shot.  They won’t let you down. 

Preheat oven to 350 Fahrenheit.

Drain one can of cooked (not seasoned or spiced) black beans.  Refill can (still full of beans) with water.  


Puree can contents for about one minute or until the mixture is evenly smooth.  Flecks of black bean are ok.  Chunks are not.


Whether using a mix or ingredients from scratch, spoon pureed mixture in with dry ingredients until thoroughly mixed.  This shouldn’t be more than 50-75 strokes.  Bake in a 9 x 11 in pan at 350 for 20-25 minutes.


Note: Cut the baking time on these brownies compared to regular, old batches.  They seemed to need significantly less time.

My next step is to try cakes with cannellinis.  Get ready.

Monday, July 26, 2010

Meaty Lasagna


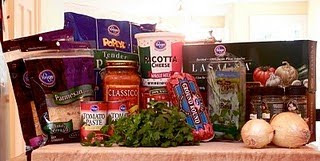
Lest you think I don't do savory...

Lasagna’s easy - at least I think.  Until this evening, I’d never made it.  But I’ve watched my mom make it my entire life.  It doesn’t matter what order the layers go in or if you forget a layer of sauce or cheese.  You just make up for it later.  I’ve always thought you just couldn’t mess it up.  And now I’m convinced that my assumption is absolutely true.

Lasagna’s also likable.  You like spaghetti?  You like lasagna.  You like chicken parmesan?  You like lasagna.  You like pizza?  You like lasagna.  The funny thing is though – I always forget that I like lasagna until I’m eating it.

I found this recipe at mylasagnarecipe.com (of all places).  Then I destroyed it.  I changed the spices.  I added spinach.  I added more meat.  I exchanged half the noodles for whole grain.  I used vodka sauce instead of Bolognese.  The recipe in this post is the one I used – not the original.

A note on cooking: Keep it in the oven until it bubbles.  I’m sure an hour is sufficient, but I kept it in for longer to give it more of a cheesy crust.  The crunch is the best part.  NOM NOM NOM.


This crunch.


Ingredients

1 pound of bratwurst (or any package of Italian sausage)
1 pound of ground beef
Cooked ham (thick slices, not steaks) to your liking
1/2 cup of chopped onions

2 cloves of garlic chopped

1 (28 ounce) can of crushed tomatoes

1 jar of vodka sauce
2 (6 ounce) cans of tomato paste

1/2 Cup of water

2 tablespoons white sugar

1 teaspoon fennel seed

2 teaspoons fresh Basil leaves (rough chopped
)
4 tablespoons fresh Italian parsley (rough chopped)
1 teaspoon salt

1 teaspoon oregano
1/2 teaspoon ground pepper

23 ounces of ricotta cheese (a normal, large container is 30 oz, so almost all)
1/2 teaspoon nutmeg 

1 egg

1 pound shredded chedder and mozzarella cheese
1 pound grated Parmesan cheese

Fresh spinach leaves
14 lasagna noodles (whole wheat & regular) (2 boxes is more than enough for lots of noodle overlay – 1 will do, however)


To make lasagna

Preheat oven to 350 degrees F.  Start your lasagna by halving each sausage and then cutting each half into about 8-10 pieces.  Bite-size pieces are important.  Combine the sausage with the ground beef, onions, and garlic cloves in a medium size pot or Dutch oven.


Brown the ground beef, Italian sausage, onions and garlic in a pot until they start to cook.  This should take about 6-9 minutes on medium-low temperature.   If you prefer, once the meat is browned, drain the grease.  (I did not, but I used high-grade, lean beef.)

Add the crushed tomatoes, the tomato sauce, the tomato paste, and the water, gently stirring them into the mixture.  Mix the sugar, fennel, fresh Basil, fresh Italian parsley, salt, oregano, and pepper into the sauce.  Cover the pot and let the meat sauce simmer on low for 1  - 1 ½ hours.


While the pot is simmering, soak the lasagna noodles in warm water.  The noodles need to be soaked in warm tap water for 15 minutes.

While the noodles are soaking, combine the ricotta, nutmeg, egg, and another 2 tablespoons of chopped, fresh Italian parsley.  Mix these up with a spoon.


Once the sauce has simmered for at least an hour, start to build your lasagna.  Using a 9×13 inch baking pan, spread 3 Cups of meat sauce on the bottom of the pan.  Lay 5-6 noodles across the layer of sauce, making sure to shake off excess water first.  Spread a layer of the ricotta cheese mixture over the layer of noodles until they are clearly covered.  Spread 1/2 of the cheese (mozzarella and cheddar) over the ricotta layer.
 Sprinkle some of the Parmesan cheese over the mozzarella layer.  Add in a layer of ham of spinach.  Repeat these layers until you’ve reached about a centimeter from the top of the baking dish.  Make sure plenty of cheese is your top layer – preferably lots of parmesan.

Bake at 350 degrees F for 25 minutes.  Cover with foil and bake for another 25 minutes.  Remove foil and bake until cheese is browned to your liking.  Allow lasagna to cool for at least 15 minutes.  Works well frozen and reheated too!


Wednesday, July 21, 2010

Sweet Potato Pie

I'm on a sweet potato kick these days.  As a kid, I never really had them and, as such, never made them for anyone else.  But recently I've been all about ipomoea batatas.  I've baked them.  I've boiled them.  I've microwaved them into submission.  I've turned them into fries.  I've paired them with fish.  I've run the gamut.  Until today, however, I hadn't actually tried sweet potato pie. 


Determined to put these beautiful root vegetables to work, I got started. 

And the smells!  Oh, the smells!  As I combined the amazingly orange potato mash with all the butter and all the cinnamon and all the ginger and -- mostly importantly -- the almond extract, I was sent swirling into some cosmic sweet potato heaven.  Now I love them more in all their tender, tuberous glory.


The recipe below yielded a lot more filling than I expected.  I filled a pie and still had more than half leftover.  So I filled a bread pan with alternating layers of graham cracker and filling to create some sort of casserole-type-thinger-majigger. 

The gross leftovers may be my fault, however.  I bought 2 sweet potatoes, one of which was absurdly large (I'm talking like a child's football).  The recipe called for 2 pounds and, not having a kitchen scale on me, I decided to throw it all in.  Following the rest of the recipe rather precisely, though, I wound up with a great, rich taste -- which tells me my proportions can't be too out of wack.

While the taste was great, I did have some issue with the pie firming up.  Choosing to cook it longer, the top got a little too firm (at least too firm to look like a typical pumpkin or sweet potato pie).  Nonetheless it still seemed a little mushy in the middle before I refrigerated it overnight.

Things I would do differently next time:

  • Avoid the graham cracker crust.  Despite my love for the simple graham cracker crust, this crust seemed to absorb all of the butter from the sweet potato and thus become part of the sweet potato mixture.  This was significantly better after I refrigerated it, but I think a different crust (like pastry or even filo) would hold up better.
  • Don't cook it as long.  Because my pie hadn't firmed up after 30 minutes at 350 degrees F, I kept it in for another 10 minutes.  In hindsight, I might add a teaspoon of cornstarch and take it out after the recommended time.


Ingredients

Filling
2 cups mashed sweet potatoes
1/4 pound butter, softened (4 sticks)
2 eggs, separated
1 cup packed brown sugar
1/4 teaspoon salt
1/2 teaspoon ground ginger
1/2 teaspoon ground cinnamon
1/2 teaspoon almond extract
1/2 cup evaporated milk (I used soy milk instead)
1/4 cup white sugar

Graham Cracker Crust
2 cups graham cracker crumbs
1/2 cup melted butter
2 tablespoons sugar


To make pie


Preheat oven to 400 degrees F.  Boil sweet potato(es) whole in skin for 40 to 50 minutes, or until thoroughly soft. Remove the skin.  Mash up the sweet potatoes with a fork until all chunks are gone.  If your sweet potato wasn't fully soft, microwave it for a few minutes.


While the potatoes boil, combine all ingredients for the graham cracker crust.  Press over bottom and sides of a pie pan.  Bake at 400 degrees F for 10 minutes.  Put in freezer until ready for filling.


In a mixing bowl, combine the sweet potatoes, butter, egg yolks, brown sugar, salt, ginger, cinnamon, almond extract and evaporated milk.  Mix together well. 

Beat egg whites until stiff peaks form; add 1/4 cup sugar and fold into sweet potato mixture. 


Pour into pie shell and bake at 400 degrees F for 10 minutes.  Reduce heat and bake at 350 degrees F for 30 minutes or until firm.  The pie may puff up like a souffle near the end of the bake time, but it will shrink once it's removed from the oven.


UPDATE: Refrigerating this pie overnight does wonders for it.  If you can refrigerate this pie overnight and follow the directions above precisely, don't make any of the changes I recommended.  It really allows it to set and pulls out a lot of the spicy flavors.  Delicious.

Changed a bit from a combo of two recipes from AllRecipes.com

Monday, July 19, 2010

Fresh Cherry, Blueberry Pie

Tonight I learned some lessons:

#1: Never give up. And never, under any circumstances, face the facts.

I think I'm pretty good at achieving the right taste in my own cooking.  And if you can't figure out what's in that sauce you had, I can probably do it.  But for the life of me, I don't know why I can't get a pie to look right.

Tonight (not today -- hence the dearth of pictures), I baked a cherry, blueberry "Old Glory" type pie.  It's summer and the cherries are fresh (more on those buggers in a minute), but mostly I just wanted to improve my pie-topping skills.  My last crust was a little disappointing -- aesthetically at least -- and recently I've been dreaming of competing with the likes of the tight lattices, the punny, and the elegant.  I say "dream"  because I'm clearly not there yet.

Tonight I decided to try out a cookie-cutter top; I found a star in the kitchen and decided to go with that. It still looked convincing once I had the pie together and some of the cut-outs on that surface.  I was a little worried about that the uneven surface that comes with fresh fruit, but I didn't realize that my little 5-pointed cut-outs would turn into writhing, starfish-like things once I tossed the pie in the oven.  Oh well. Starfish it is.  Delicious, cherry-topped, egg-washed, floury starfish.  Another day -- Another pie crust.


#2: Buy the damn cherry pitter.

In practice, I consider myself a conservative in the kitchen.  I don't like the Slap-Chop choppers; I prefer to do it by hand.  I don't like the new KitchenAid; I have the old Oster.  So I started tonight's adventure by googling around about how to pit a cherry -- by hand and without a pitter.  The furthest I got though was people telling me to hammer a nail through a board and impale the cherries on it, or better yet to fish-hook the pit out with an S-shaped paperclip.  None of those ideas turned me on though, so I got out my knife.

But after an hour of hacking at these cherries with a sharp paring knife, I give in.  I'm covered in cherry juice and at least 1/4 of all my cherries are in the trash on the pits.  Next time I'm near a kitchen shop, I'm buying a cherry pitter.  

After looking around, I discovered that they range in price and level of complicated like any kitchen utensil.  You can have one that pits a whole bag of cherries, or one that catches the pits.  I don't even want a complicated one though.  I just want one like this or this.

MIU Polished Stainless-Steel Cherry Stoner


Dalla Piazza Lustro Cherry Pitter

I've been so distracted by the details of cherry-pitting and starfish-lamenting that I've entirely neglected the wonderful pie recipe.  As always, it's simple and it's delicious.  I think this one manages the tart and sweet balance significantly better than the last (blueberry) pie.  It's a great summer pick.  The next time I make this pie though, I'll replace my sweet sea creatures with a full-coverage top crust and sugar in the raw.


Ingredients

3 cups fresh sour cherries, pitted (include juice produced during pitting) (or 4 cups frozen unsweetened)
1 cup fresh blueberries
1 cup sugar
3 tablespoons quick-cooking tapioca or cornstarch (I used cornstarch)
Pastry dough for crusts (any one will do)


To make pie

Preheat oven to 400°F. Line heavy baking sheet with foil and set on middle rack of oven. In large bowl, combine cherries, sugar, and tapioca or cornstarch; mix well and let stand while preparing crust.  Pour filling into crust. Top with pieces of butter. Brush rim of bottom crust lightly with egg wash (1 beaten egg).

Apply to crust. Brush with milk (or soymilk) and sprinkle with 1 1/2 teaspoons sugar.  Place pie on baking sheet in oven. Bake 20 minutes. Cover crust edges with foil collar to prevent overbrowning. Continue to bake until filling bubbles and crust is golden brown, about 30 minutes longer. Transfer pie to rack and cool at least 1 hour.  Serve warm or at room temperature.


Adapted from Epicurious.

Tuesday, July 13, 2010

Burnt Sugar Almonds (Gebrannte Mandeln)

Let me start by telling you about how easy and great everyone else thinks this recipe is.  The reviews are madly good and other home cooks rave about how wonderful their almonds turned out.  


My first attempt at this recipe, however, ended, well, rather smokily.  I suppose I took the name too literally.  Once I noticed that half of my spatula was gone and that my almonds were suddenly, umm, black, I started over.  This entry is about the second, more experienced, and measurably more successful attempt.  Before we begin, though, some words to the wise from my failed attempt:

  • Do not use a plastic spatula.  Common sense - I know.  I thought it might be ok, but the recipe is very sticky and the temperature just gets too hot for too long.
  • Do not leave the pan's side.  Just stir until it's done.  Who knew?  This is the least independent food I've ever made.
  • Do not use a non-stick pan to cook the almonds. Not sure precisely why, but that was a mistake.

Around Christmas in Germany, you can smell gebrannte Mandeln, or "burnt almonds" at every Christmas market.   Though it's certainly not as common in the U.S.A, I recently had some in New York and was reminded of how much I missed them.  And so, I went searching for a decent recipe and found they are all remarkably similar.  I like this recipe, but I'm sure that almost any one will do.

I also think it might be interesting to try this recipe with another herb or spice added to it for a more gourmet palette.  I could see it pairing well with a cinnamon stick, cardamom, powdered ginger, or rose or lavender oil.  Just don't use anything you'd have to fish out of the sticky mix later (like rosemary or bay).

I started by doubling this recipe and it went off without a hitch the second time.  I was getting a little worried after about 10 minutes of stirring, but everything went smoothly -- this time at least.  If you follow the recipe below, the mixture will stay rather very syrupy until about 15-20 minutes in, when it turns to sand almost instantly.  Just keep stirring.


Ingredients/Zutaten

200 grams whole almonds/Mandeln (ganz)
200 grams sugar/Zucker
100 mL Water/Wasser
1 packet vanilla sugar/Päckchen Vanillinzucker
Some cinnamon
Some butter


To make almonds/Zubereitung

Boil the cinnamon, sugar, vanilla sugar, and water.  Add the almonds and stir them under the mixture.  It will become frothy as it gets closer to being done.


Turn up the heat and stir constantly until the sugar mixture is dry and has a bulky, sandy texture.  Then turn the heat down to medium/medium-low and stir it until the sugar begins to melt again and the almonds start to shine.  


Shake the almonds out onto a no-stick baking pan and spread them around evenly.  In place of a no-stick baking plan, coat the pan in butter.


Zimt, Zucker, Vanillezucker und Wasser zum Kocken bringen, Mandeln zugeben und unter Rühren weiterkochen bis der Zucker trocken wird.  Dann weiterrühren bis der Zucker wieder leicht zu schmelzen beginnt und die Mandeln glänzen.  Ein Backblech mit Butter einfetten, Mandeln draufschütten, zerteilen und abkühlen lassen.


Adapted from Chefkoch.de.